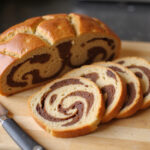
Marble Rye Bread Recipe: Swirling Flavors in Every Slice 🍞🌟👨🍳
1. Introduction
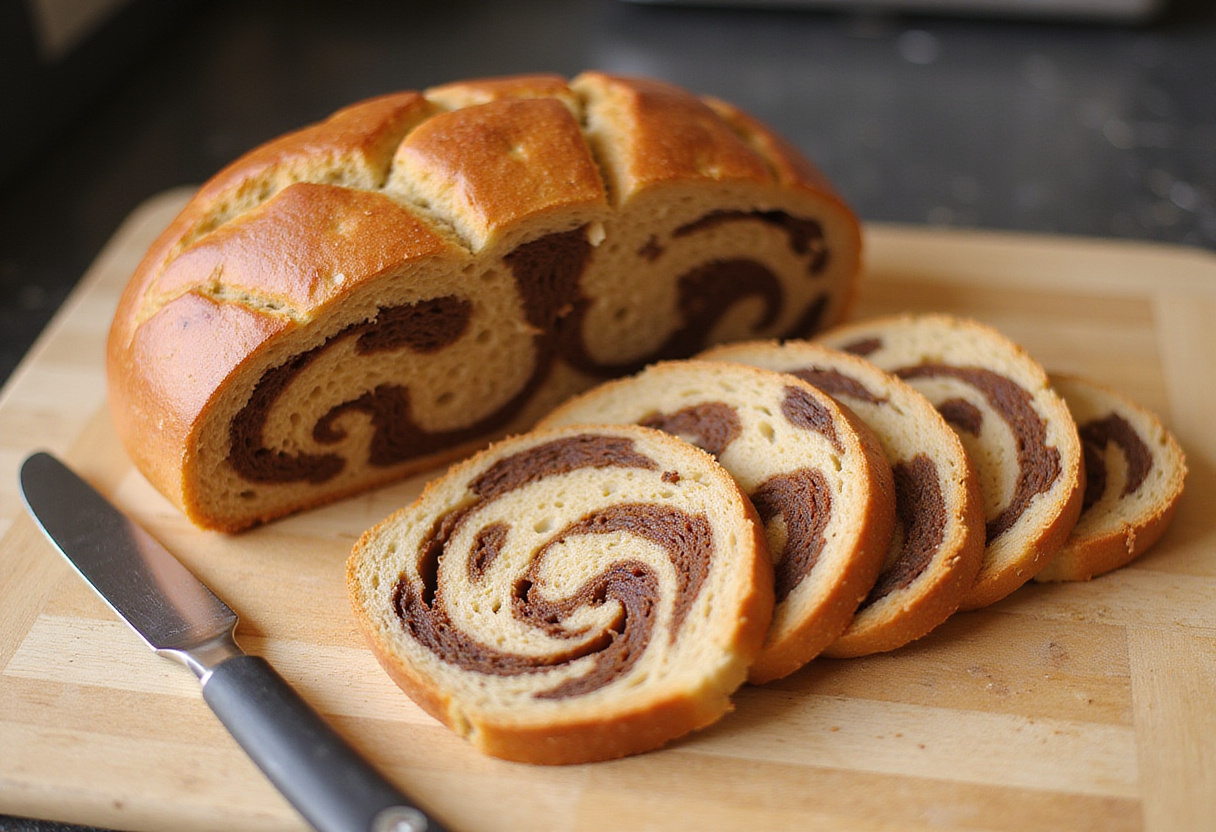
Craving that classic bakery taste? The marble rye bread recipe is a delightful baking project that combines the tangy flavor of rye with a beautiful swirled pattern, creating a bread that’s both delicious and visually appealing. This swirled rye bread recipe results in a loaf that’s not only perfect for sandwiches and toast but also a stunning centerpiece for any bread basket. Mastering the marble rye loaf recipe might seem intimidating, but with this guide, you’ll impress your family and friends with a homemade loaf that rivals even the best bakeries! The distinctive rye bread with marble pattern makes it a standout addition to any meal. It’s also surprisingly versatile. Whether you’re making a hearty Reuben or simply enjoying a slice with butter, it will definitely hit the spot. Follow this guide to create your own perfect loaf!
2. Ingredients Needed
Before you start, let’s gather all the necessary ingredients. Quality ingredients will make a big difference in the final outcome of your marble rye bread recipe. Here’s what you’ll need:
3 ½ cups bread flour
1 ½ cups rye flour
2 cups warm water (105-115°F)
2 teaspoons active dry yeast
2 tablespoons caraway seeds
2 tablespoons unsweetened cocoa powder
2 tablespoons molasses
2 teaspoons salt
2 tablespoons vegetable oil
3. Equipment Required
Having the right equipment on hand will make the baking process smoother and more enjoyable. Here’s a list of the essential tools you’ll need for this swirled rye bread recipe:
Large mixing bowl
Measuring cups and spoons
Baking sheet
Loaf pan (9×5 inches)
Parchment paper
Cooling rack
4. Step-by-Step Instructions
Ready to get baking? Follow these detailed, step-by-step instructions to create your perfect marble rye loaf recipe.
Step 1: Activate the Yeast
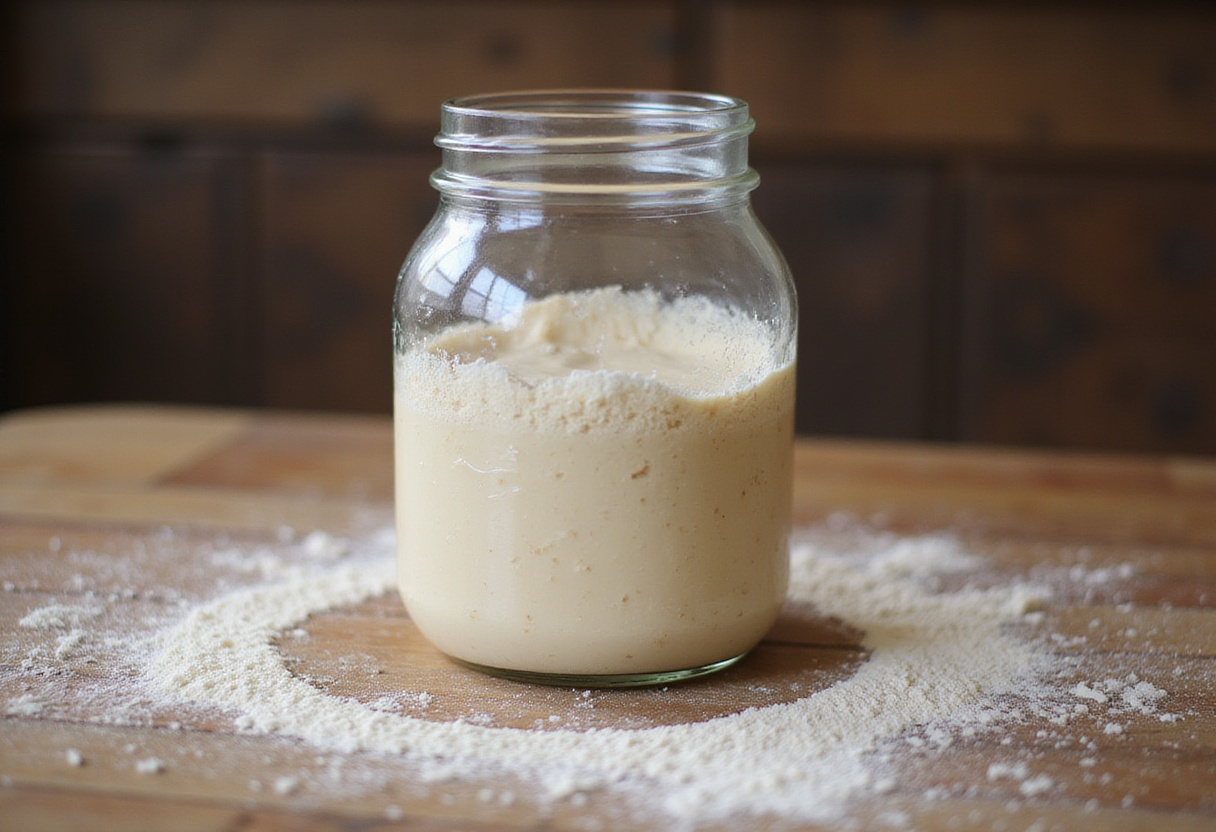
The first step is to ensure your yeast is active. In a large mixing bowl, dissolve the yeast in warm water (between 105-115°F). You can find great yeast at Red Star Yeast’s Website. Let it stand for 5-10 minutes until it becomes foamy. This step ensures that the yeast is active and ready to leaven the dough for your marble rye bread recipe. If the yeast doesn’t foam, it might be old, and you’ll need to use fresh yeast to proceed.
Step 2: Prepare the Dough
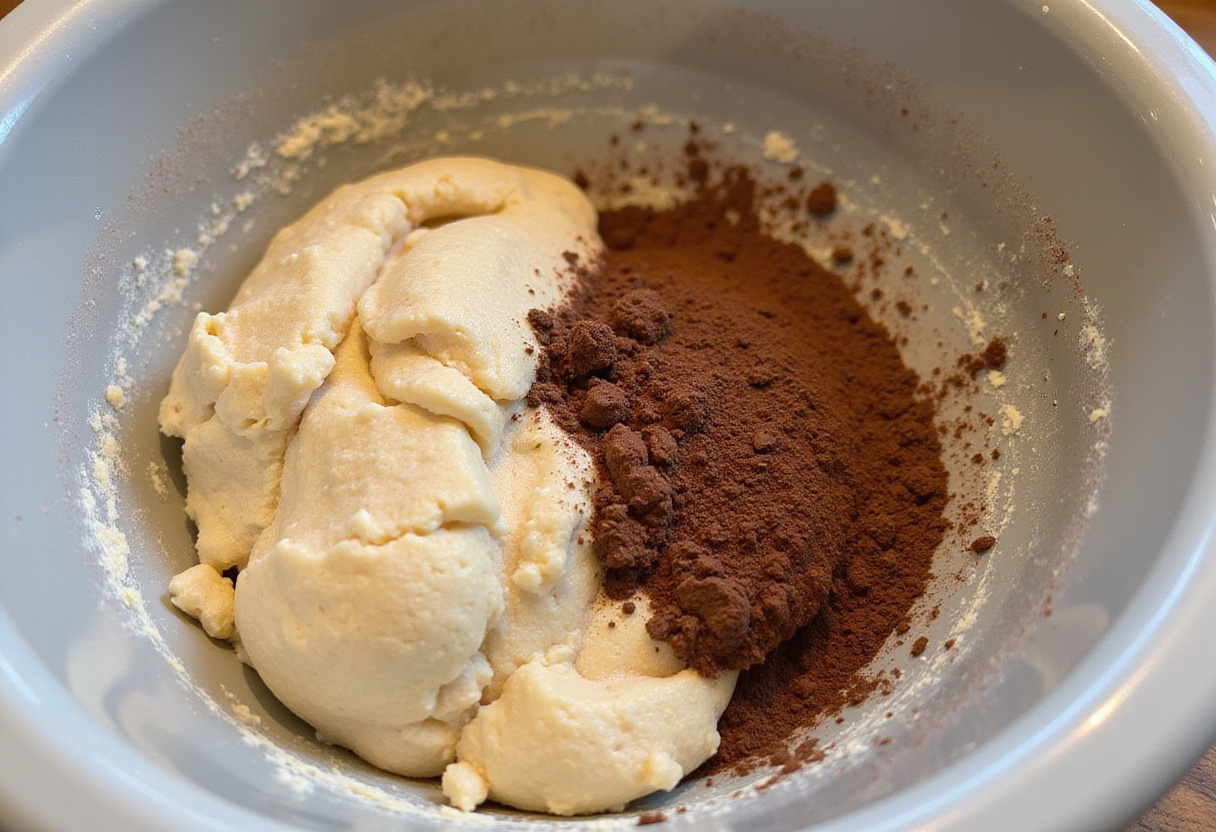
Now it’s time to create the two doughs that will form the characteristic marble pattern. Add bread flour, rye flour, salt, caraway seeds, and vegetable oil to the yeast mixture. Mix until a shaggy dough forms. Divide the dough in half. To one half, add cocoa powder and molasses. These ingredients will not only give the dough its dark color but also add a subtle sweetness and depth of flavor. Knead both halves separately for 5-7 minutes until smooth and elastic. The cocoa and molasses will create the dark swirl in your swirled rye bread recipe. If the dough is too sticky, add a little flour, one tablespoon at a time until it becomes manageable. Consider some soup to dunk your bread.
Step 3: Create the Marble Pattern
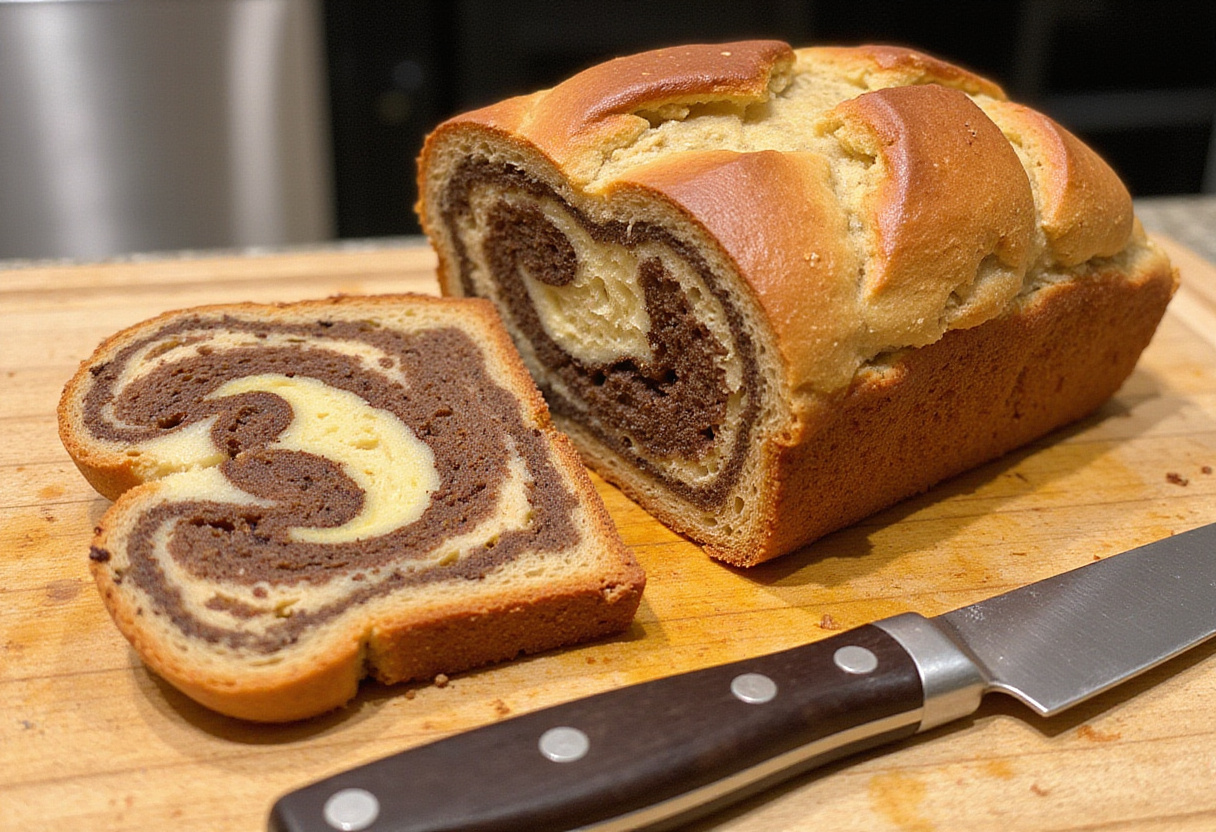
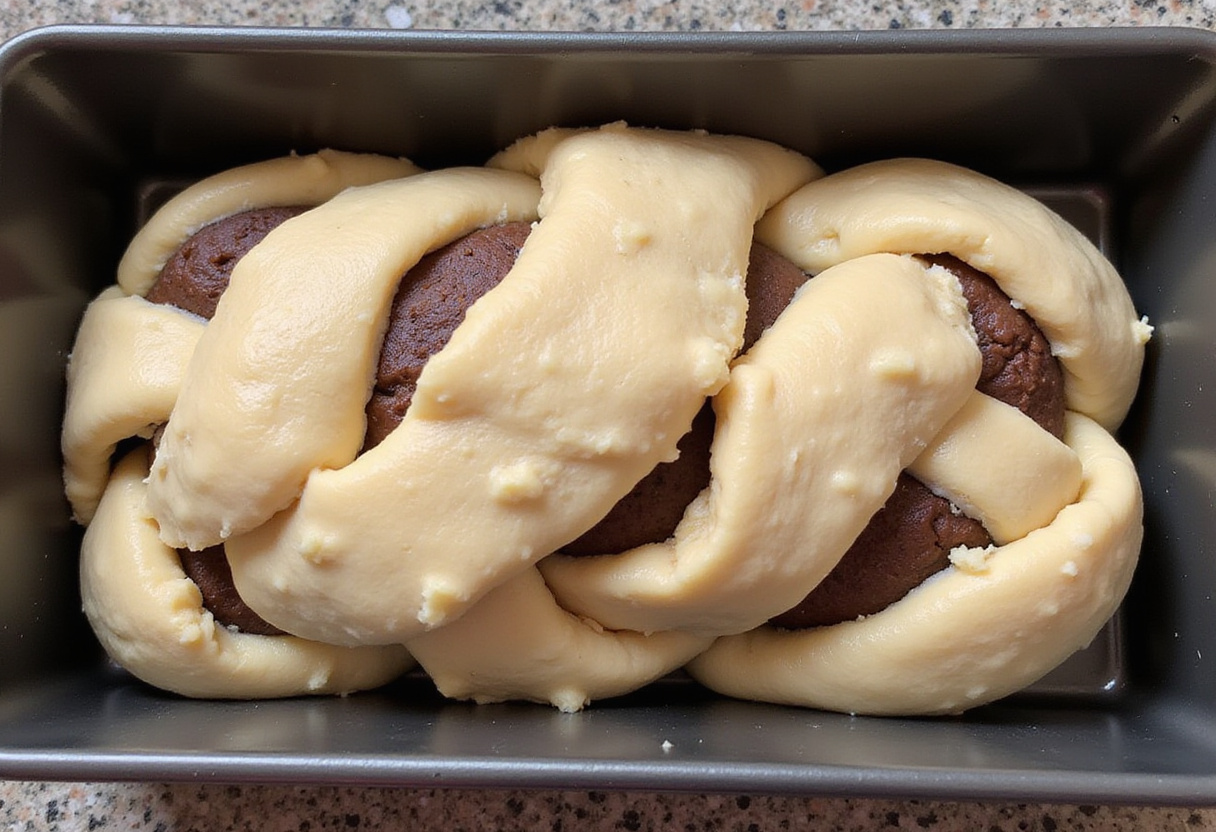
This is where the magic happens! Let both doughs rise in separate greased bowls for about 1-1.5 hours, or until doubled in size. This allows the yeast to work its magic and develop the flavor of the bread. Punch down both doughs to release the air. On a lightly floured surface, roll each dough into a rectangle. Place the dark dough on top of the light dough. Roll them up together tightly like a jelly roll. Place the rolled dough into a greased 9×5 inch loaf pan. This technique creates the beautiful rye bread with marble pattern that everyone loves. Make sure the seam is facing down in the pan. If you’re looking for more delicious recipes, check out these dinner ideas.
Step 4: Bake the Bread
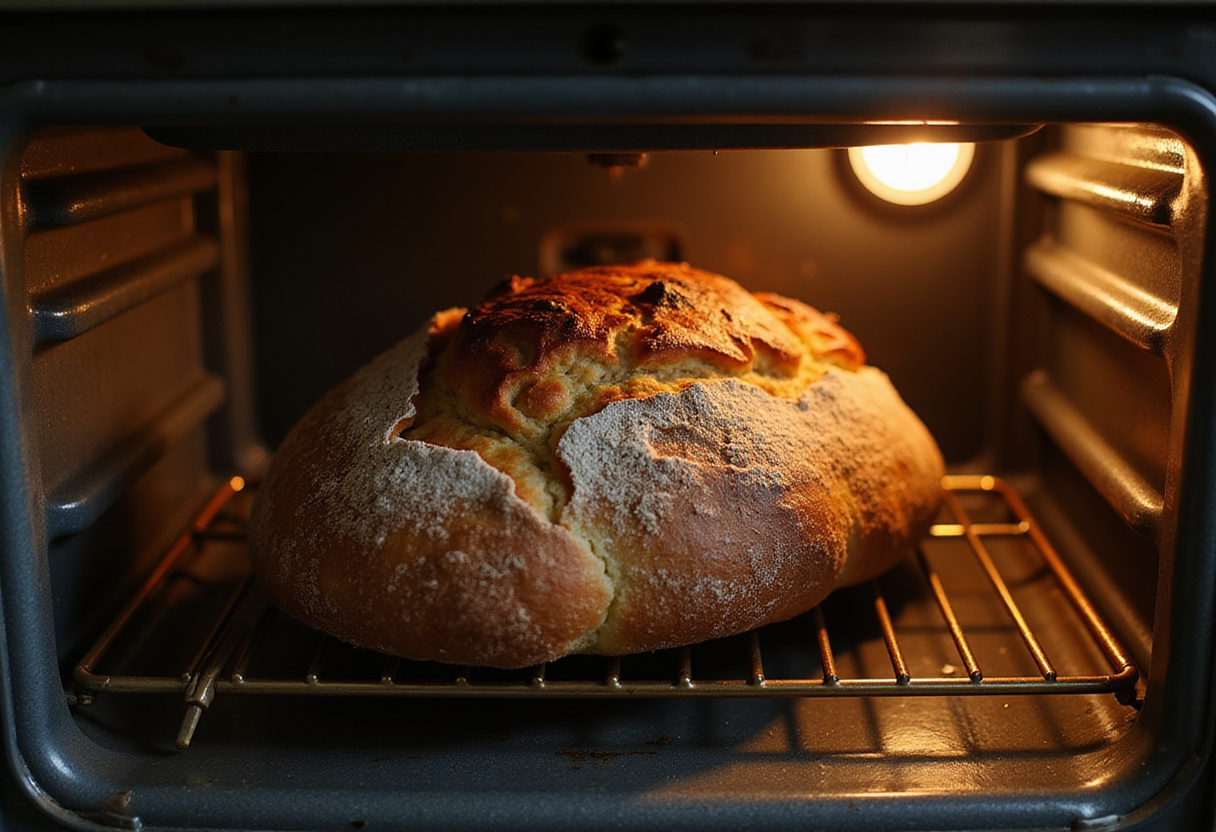
Almost there! Preheat your oven to 350°F (175°C). Let the dough rise in the loaf pan for another 30 minutes. This second rise will give the bread its final lift and airy texture. Bake for 45-50 minutes, or until the internal temperature reaches 200°F (93°C). Using a kitchen thermometer is crucial to ensure the bread is fully cooked. If the top starts to brown too quickly, cover it loosely with foil. This ensures your marbled rye loaf recipe is perfectly baked with a beautiful crust. Why not bake some desserts to go with your rye bread?
5. Tips for the Perfect Marble Rye Bread
Want to elevate your marble rye bread recipe to the next level? Here are some expert tips:
Ensure your yeast is fresh to achieve the best rise. Old yeast can result in a dense loaf.
Knead the dough thoroughly to develop the gluten, resulting in a better texture. Look for a smooth and elastic feel.
Use a thermometer to check the internal temperature for perfectly baked bread. Over-baking can result in a dry loaf.
Let the bread cool completely before slicing to prevent it from becoming gummy. Patience is key!
6. Serving Suggestions
The marble rye bread recipe is incredibly versatile and pairs well with a variety of dishes. Here are some delicious serving ideas:
Corned beef and Swiss cheese for a classic Reuben sandwich. A must-try combination!
Cream cheese and smoked salmon for a delightful brunch option.
Deli meats and mustard for a quick and easy lunch.
Simply toasted with butter for a simple yet satisfying snack.
7. Variations
Feeling adventurous? Try these variations to put your own spin on the classic marble rye loaf recipe:
Add a tablespoon of instant coffee powder to the dark dough for a mocha flavor. This adds a subtle coffee undertone that complements the rye.
Replace caraway seeds with fennel seeds for a different aromatic profile. Fennel seeds offer a licorice-like flavor.
Experiment with different flours, such as whole wheat, for a heartier loaf. This will add a nutty flavor and denser texture. Maybe try our recipe for Hot Cross Buns.
8. Storage Instructions
Proper storage is essential to keep your homemade bread fresh. Store your marble rye bread recipe in an airtight container at room temperature for up to 3 days or in the refrigerator for up to a week. For longer storage, slice and freeze the bread, then thaw as needed. This keeps the swirled rye bread recipe fresh for whenever you want to enjoy it. Looking for something for breakfast?
9. Conclusion
Creating a marble rye loaf recipe at home is a rewarding experience. The beautiful swirls and tangy flavor make it a standout bread for any occasion. With this comprehensive guide, you can easily bake your own stunning rye bread with marble pattern. Don’t be afraid to experiment and make it your own! Enjoy the delicious results of your homemade marble rye bread recipe! Don’t forget to visit our about us page to learn more.
Bake a beautiful and flavorful Marble Rye Bread with this easy-to-follow recipe. Learn how to create stunning swirls and enjoy a tangy, delicious loaf perfect for sandwiches, toast, or as a side. This Marble Rye Bread recipe will guide you through each step, ensuring a perfect bake every time.
Ingredients
Scale
3 ½ cups bread flour
1 ½ cups rye flour
2 cups warm water (105-115°F)
2 teaspoons active dry yeast
2 tablespoons caraway seeds
2 tablespoons unsweetened cocoa powder
2 tablespoons molasses
2 teaspoons salt
2 tablespoons vegetable oil
Instructions
In a large mixing bowl, dissolve the yeast in warm water. Let it stand for 5-10 minutes until foamy.
Add bread flour, rye flour, salt, caraway seeds, and vegetable oil to the yeast mixture. Mix until a shaggy dough forms.
Divide the dough in half. To one half, add cocoa powder and molasses.
Knead both halves separately for 5-7 minutes until smooth and elastic.
Let both doughs rise in separate greased bowls for about 1-1.5 hours, or until doubled in size.
Punch down both doughs. On a lightly floured surface, roll each dough into a rectangle.
Place the dark dough on top of the light dough. Roll them up together like a jelly roll.
Place the rolled dough into a greased 9×5 inch loaf pan.
Preheat your oven to 350°F (175°C). Let the dough rise in the loaf pan for another 30 minutes.
Bake for 45-50 minutes, or until the internal temperature reaches 200°F (93°C). If the top starts to brown too quickly, cover it loosely with foil.
Let the bread cool completely before slicing.
Notes
Ensure your yeast is fresh for the best rise.
Knead the dough thoroughly to develop gluten for a better texture.
Use a thermometer to check the internal temperature for perfectly baked bread.
Let the bread cool completely before slicing to prevent it from becoming gummy.
Prep Time:30 minutes
Cook Time:45 minutes
Category:Bread
Method:Baking
Cuisine:American
Nutrition
Serving Size:1 slice
Calories:180 Kcal
Sugar:3g
Sodium:250mg
Fat:3g
Saturated Fat:0.5g
Unsaturated Fat:2g
Trans Fat:0g
Carbohydrates:35g
Fiber:3g
Protein:5g
Cholesterol:0mg
Hi There!
Welcome to RecipesAlways.com! I’m Chef Megan, and I’m so excited to have you here as we embark on this flavorful journey together.